Return the n largest/smallest values for column in DataFrame

Get n-largest values from a particular column in Pandas DataFrame

df.nlargest(5, 'Gross')

Return the first n rows with the smallest values for column in DataFrame

df.nsmallest(5, ['Age'])

To order by the smallest values in column “Age” and then “Salary”, we can specify multiple columns like in the next example.

df.nsmallest(5, ['Age', 'Salary'])

There is also an optional keep parameter for the nlargest and nsmallest functions. keep has three possible values: {'first', 'last', 'all'}. The default is 'first'

Where there are duplicate values:

  • first : take the first occurrence.
  • last : take the last occurrence.
  • all : do not drop any duplicates, even it means selecting more than n items.
df.nlargest(5, 'Gross', keep='last')

Working with a New Dataset / DataFrame

When you are working with a new Pandas DataFrame, these attributes and methods will give you insights into key aspects of the data.

The dir function let’s you look at all of the attributes that a Python object has.

dir(df)

The shape attribute returns a tuple of integers indicating the number of elements that are stored along each dimension of an array. For a 2D-array with N rows and M columns, shape will be (N,M). 

df.shape

You may be working with a dataframe that has hundreds or thousands of rows. To get a glimpse of the data inside a dataframe without printing out all of the values you can use the head and tail methods.

Returns the first n rows in the dataframe

df.head() # returns rows 0-4
df.head(n) # returns the first n rows

Returns the last n rows in the dataframe

df.tail()
df.tail(n)

The count method of a dataframe shows you the number of entries for each column

df.count()

Check if there are any missing values in any of the columns

pd.isnull(df).any()

The info method of the dataframe gives a bunch of information. It tells

  1. The number of entries in the df
  2. The names of the columns
  3. The number of columns
  4. The number of entries in each column
  5. The dtype of each column
  6. If there are null values in a column
df.info()

Different Ways to Create Pandas DataFrames

A Pandas DataFrame is a 2D labeled data structure with columns of potentially different types.

There are a variety of different methods and syntaxes that can be used to create a pd.DataFrame.

Firstly, make sure you import the pandas module:

import pandas as pd

Method 1: Creating DataFrame from list of lists

# initialize list of lists
data = [['bob', 20], ['jane', 30], ['joe', 40]]
 
# Create the pandas DataFrame
df = pd.DataFrame(data, columns = ['Name', 'Age'])
df

Output:

Method #2: Creating DataFrame from dictionary of lists

In this method, you define a dictionary which has the column name as the key which corresponds to an array of row values.

# initialize dictionary of lists
data = {'Name': ['Bob', 'Joe', 'Jane', 'Jack'],
        'Age': [30, 30, 21, 40]}
 
# Create DataFrame
df = pd.DataFrame(data)
df

Output:

You can use custom index values for the DataFrame by adding a parameter to the pd.DataFrame function. Set the optional index parameter of the pd.DataFrame function to an array of strings for the index values.

df = pd.DataFrame(data, index=['first',
                                'second',
                                'third',
                                'fourth'])
df

Output:

In the same way that we just defined the index values, you can also define the column names separately. Set the optional columns parameter of the pd.DataFrame function to an array of strings for the column values.

Notice that the row values are now defined as a list of lists rather than a dictionary of lists. This is because the column values are no longer being defined with them.

df = pd.DataFrame(
    [[4,5,6],
     [7,8,9],
     [10,11,12]],
    index = ['row_one','row_two','row_three'],
    columns=["a","b","c"]
    )

df

Output:

Method #3: Creating DataFrame using zip() function.

The zip function returns an iterator of tuples where the corresponding items in each passed iterator is paired together. By calling the list function on the object returned from the zip function, we convert the object to a list which can be passed into the pd.DataFrame function.

name = ["Bob", "Sam", "Sally", "Sue"]
age = [19, 17, 51, 49]

data = list(zip(name, age))

df = pd.DataFrame(data,
                  columns = ['Name', 'Age'])

df

Output:

How to Split Training and Test Data in Python

In this article, I’ll be explaining why you should split your dataset into training and testing data and showing you how to split up your data using a function in the scikitlearn library.

If you are training a machine learning model using a limited dataset, you should split the dataset into 2 parts: training and testing data.

The training data will be the data that is used to train your model. Then, use the testing data to see how the algorithm performs on a dataset that it hasn’t seen yet.

If you use the entire dataset to train the model, then by the time you are testing the model, you will have to re-use the same data. This provides a slightly biased outcome because the model is somewhat “used” to the data.

We will be using the train_test_split function from the Python scikitlearn library to accomplish this task. Import the function using this statement:

from sklearn.model_selection import train_test_split

This is the function signature for the train_test_split function:

sklearn.model_selection.train_test_split(*arrays, test_size=None, train_size=None, random_state=None, shuffle=True, stratify=None)

The first parameters to the function are a sequence of arrays. The allowed inputs are lists, numpy arrays, scipy-sparse matrices or pandas dataframes.

So the first argument is gonna be our features variable and the second argument is gonna be our targets.

# X = the features array
# y = the targets array
train_test_split(X, y, ...)

The next parameter test_size represents the proportion of the dataset to include in the test split. This parameter should be either a floating point number or None (undefined). If it is a float, it should be between 0.0 and 1.0 because it represents the percentage of the data that is for testing. If it is not specified, the value is set to the complement of the train size.

This is saying that I want the test data set to be 20% of the total:

train_test_split(X, y, test_size=0.2)

train_size is the proportion of the dataset that is for training. Since test_size is already specified, there is no need to specify the train_size parameter because it is automatically set to the complement of the test_size parameter. That means the train_size will be set to 1 – test_size. Since the test_size is 0.2, train_size will be 0.8.

The function has a shuffle property, which is set to True by default. If shuffle is set to True, the function will shuffle the dataset before splitting it up.

What’s the point of shuffling the data before splitting it? If your dataset is formatted in an ordered way, it could affect the randomness of your training and testing datasets which could hurt the accuracy of your model. Thus, it is recommended that you shuffle your dataset before splitting it up.

We could leave the function like this or add another property called random_state.

random_state controls the shuffling applied to the data before applying the split. Pass an int for reproducible output across multiple function calls. We are using the arbitrary number 10. You can really use any number.

train_test_split(X, y, test_size=0.2, random_state=10)

The function will return four arrays to us: a training and testing dataset for the feature(s), and a training and testing dataset for the target.

We can use tuple unpacking to store the four values that the function returns:

X_train, X_test, y_train, y_test = train_test_split(X, y, test_size=0.2, random_state=10)

Now, you can verify that the splitting was successful.

The percent of the training set will be the number of rows in X_train divided by the total number of rows in the dataset as a whole:

len(X_train)/len(X)

The percent of the testing dataset will be the number of rows in X_test divided by the total number of rows in the dataset:

len(X_train)/len(X)

The numbers returned by these calculations will probably not be exact numbers. For example, if you are using an 80/20 split, then this division by give you numbers like 0.7934728 instead of 0.80 and 0.1983932 instead of 0.20.

That’s it!

How to Create 3-D Charts with Matplotlib in Jupyter Notebook

In this article, I will show you how to work with 3D plots in Matplotlib. Specifically, we will be making a 3D line plot and surface plot.

First, import matplotlib and numpy. %matplotlib inline just sets the backend of matplotlib to the ‘inline’ backend, so the output of plotting commands shows inline (directly below the code cell that produced it).

import matplotlib.pyplot as plt
import numpy as np

%matplotlib inline

Add this import statement to work with 3D axes in matplotlib:

from mpl_toolkits.mplot3d.axes3d import Axes3D

Now, let’s generate an empty 3D plot

fig = plt.figure()
ax = plt.axes(projection='3d')

plt.show()

3-D Line Plot

Now, it’s time to put a graph on the plot. We’ll start by making a 3D line plot.

We need to define values for all 3 axes:

z = np.linspace(0, 1, 100)
x = z * np.sin(25 * z)
y = z * np.cos(25 * z)

If we print out the shape of the arrays we just created, we’ll see that they are one-dimensional arrays.

>>> print('Z Array: ', z.shape)
Z Array:  (100,)

This is important because the plot3D function only accepts 1D arrays as inputs. Now, we can add the plot!

ax.plot3D(x, y, z, 'blue')

plt.show()

Final code:

import matplotlib.pyplot as plt
import numpy as np
from mpl_toolkits.mplot3d.axes3d import Axes3D
%matplotlib inline

fig = plt.figure()
ax = plt.axes(projection='3d')

z = np.linspace(0, 1, 100)
x = z * np.sin(25 * z)
y = z * np.cos(25 * z)

ax.plot3D(x, y, z, 'blue')

plt.show()

3-D Surface Plot

Now, we will make a 3D surface graph on the plot.

We need to define values for all 3 axes:

x = np.linspace(start=-2, stop=2, num=200)
y = x_4.copy().T
z = 3**(-x_4**2-y_4**2)

The x, y, z arrays we just created are all 1D arrays. The surface plot function requires 2D array inputs so we need to convert the numpy arrays to be 2D. We can use the reshape function for this.

x = np.reshape(x,(1, x.size))
y = np.reshape(y,(1, y.size))
z = np.reshape(z,(1, z.size))

So now if we print our arrays, we see that they’re 2D.

>>> print('X Array: ', x.shape)
X Array:  (200, 200)

Now, we can plot the surface graph!

ax.plot_surface(x, y, z)

plt.show()

Final code:

import matplotlib.pyplot as plt
import numpy as np
from mpl_toolkits.mplot3d.axes3d import Axes3D
%matplotlib inline

fig = plt.figure()
ax = plt.axes(projection='3d')

x = np.linspace(start=-2, stop=2, num=200)
y = x_4.copy().T
z = 3**(-x_4**2-y_4**2)

x = np.reshape(x,(1, x.size))
y = np.reshape(y,(1, y.size))
z = np.reshape(z,(1, z.size))

ax.plot_surface(x, y, z)

plt.show()

We can also add a title and axis labels to the graph:

ax.set_title('My Graph')

ax.set_xlabel('X', fontsize=20)
ax.set_ylabel('Y', fontsize=20)
ax.set_zlabel('Z', fontsize=20)

This is just a basic intro to 3D charting with Matplotlib. There are a variety of other types of plots and customizations that you can make. Happy graphing!

Calculate Derivative Functions in Python

In machine learning, derivatives are used for solving optimization problems. Optimization algorithms such as gradient descent use derivatives to decide whether to increase or decrease the weights in order to get closer and closer to the maximum or minimum of a function. This post covers how these functions are used in Python.

Symbolic differentiation manipulates a given equation, using various rules, to produce the derivative of that equation. If you know the equation that you want to take the derivative of, you can do symbolic differentiation in Python. Let’s use this equation as an example:

f(x) = 2x2+5

Import SymPy

In order to do symbolic differentiation, we’ll need a library called SymPy. SymPy is a Python library for symbolic mathematics. It aims to be a full-featured computer algebra system (CAS). First, import SymPy:

from sympy import *

Make a symbol

Variables are not defined automatically in SymPy. They need to be defined explicitly using symbols. symbols takes a string of variable names separated by spaces or commas, and creates Symbols out of them. Symbol is basically just the SymPy term for a variable.

Our example function f(x) = 2x2+5 has one variable x, so let’s create a variable for it:

x = symbols('x')

If the equation you’re working with has multiple variables, you can define them all in one line:

x, y, z = symbols('x y z')

Symbols can be used to create symbolic expressions in Python code.

>>> x**2 + y         
x2+y
>>> x**2 + sin(y)   
x2+sin(y)

Write symbolic expression

So, using our Symbol x that we just defined, let’s create a symbolic expression in Python for our example function f(x) = 2x2+5:

f = 2*x**2+5

Take the derivative

Now, we’ll finally take the derivative of the function. To compute derivates, use the diff function. The first parameter of the diff function should be the function you want to take the derivative of. The second parameter should be the variable you are taking the derivative with respect to.

x = symbols('x')
f = 2*x**2+5

df = diff(f, x)

The output for the f and df should look like this:

>>> f
2*x**2+5
>>> df
4*x

You can take the nth derivative by adding an optional third argument, the number of times you want to differentiate. For example, taking the 3rd derivative:

d3fd3x = diff(f, x, 3)

Substituting values into expressions

So we are able to make symbolic functions and compute their derivatives, but how do we use these functions? We need to be able to plug a value into these equations and get a solution.

We can substitute values into symbolic equations using the subs method. The subs method replaces all instances of a variable with a given value. subs returns a new expression; it doesn’t modify the original one. Here we substitute 4 for the variable x in df:

>>> df.subs(x, 4)
16

To evaluate a numerical expression into a floating point number, use evalf.

>>> df.subs(x, 4).evalf()
16.0

To perform multiple substitutions at once, pass a list of (old, new) pairs to subs. Here’s an example:

>>> expr = x**3 + 4*x*y - z
>>> expr.subs([(x, 2), (y, 4), (z, 0)])
40

The lambdify function

If you are only evaluating an expression at one or two points, subs and evalf work well. But if you intend to evaluate an expression at many points, you should convert your SymPy expression to a numerical expression, which gives you more options for evaluating expressions, including using other libraries like NumPy and SciPy.

The easiest way to convert a symbolic expression into a numerical expression is to use the lambdify function.

The lambdify function takes in a Symbol and the function you are converting. It returns the converted function. Once the function is converted to numeric, you can Let’s convert the function and derivative function from our example.

>>> f = lambdify(x, f)
>>> df = lambdify(x, df)
>>> f(3)
23
>>> df(3)
12

Here’s an example of using lambdify with NumPy:

>>> import numpy
>>> test_numbers = numpy.arange(10)   
>>> expr = sin(x)
>>> f(test_numbers)
[ 0.          0.84147098  0.90929743  0.14112001 -0.7568025  -0.95892427  -0.2794155   0.6569866   0.98935825  0.41211849]

The application of these functions in a data science solution will be covered in another post.

Introduction to Gradient Descent with Python

In this article, I’m going to talk about a popular optimization algorithm in machine learning: gradient descent. I’ll explain what gradient descent is, how it works, and then we’ll write the gradient descent algorithm from scratch in Python. This article assumes you are familiar with derivatives in Calculus.

What is Gradient Descent?

Gradient descent is an optimization algorithm for finding the minimum of a function. The algorithm does this by checking the steepness of the slope along the graph of a line and using that to slowly move towards the lowest point, which presumably has a slope of 0. Write an algorithm to find the lowest cost.

You can think of gradient descent as akin to a blind-folded hiker on top of a mountain trying to get to the bottom. The hiker must feel the incline, or the slope, of the mountain in order to get an idea of where she is going. If the slope is steep, the hiker is closer to the peak and can take bigger steps. If the slope is less steep, the hiker is closer to the bottom and takes smaller steps. If the hiker feels flat ground (a zero slope), she can assume she’s reached the bottom, or minimum.

So given a function with a convex graph, the gradient descent algorithm attempts to find the minimum of the function by using the derivative to check the steepness of points along the line and slowly move towards a slope of zero. After all, “gradient” is just another word for slope.

Implement Gradient Descent in Python

Before we start, import the SymPy library and create a “symbol” called x. We’ll be needing these lines later when we are working with math functions and derivatives.

from sympy import *
x = Symbol('x')

We create our gradient_descent function and give it two parameters: cost_fn, starting_point and learning_rate. The cost_fn is the math function that we want to find the minimum of. The initial_guess parameter is the integer that is our first guess for the x-value of the minimum of the function. We will update this variable to be our new guess after each learning iteration. The last parameter is the learning rate.

def gradient_descent(cost_fn, initial_guess, learning_rate):
    df = cost_fn.diff(x)
    df = lambdify(x, df)

    new_x = initial_guess

    for n in range(100):
        # Step 1: Predict (Make a guess)
        previous_x = new_x

        # Step 2: Calculate the error
        gradient = df(previous_x)

        # Step 3: Learn (Make adjustments)
        new_x = previous_x - learning_rate * gradient

Inside the function, we first get the derivative of the cost function that was inputted as a parameter using the diff function of the SymPy library. We store the derivative in the df variable. Then, we use the lambdify function because it allows us to plug our predictions into the derivative function. Read my article on calculating derivatives in Python for more info on this.

In the for loop, our gradient descent function is following the 3-step algorithm that is used to train many machine learning tools:

  1. Predict (Make a guess)
  2. Calculate the error
  3. Learn (Make adjustments)

You can learn more about this process in this article on how machines “learn.”

In the for loop, the first step is to make an arbitrary guess for the x-value of the minimum of the function. We do this by setting previous_x to new_x, which is the user’s initial guess. previous_value will help us keep track of the preceding prediction value as we make new guesses.

Next, we calculate the error or, in other words, we see how far our current guess is from the minimum of the function. We do this by calculating the derivative of the function at the point we guessed, which will give us the slope at that point. If the slope is large, the guess is far from the minimum. But if the slope is close to 0, the guess is getting closer to the minimum.

Next, we “learn” from the error. In the previous step, we calculated the slope at the x-value that we guessed. We multiply that slope by the learning_rate and subtract that from the current guess value stored in previous_x. Then, we store this new guess value back into new_x.

Then, we run these steps over and over in our for loop until the loop is over.

Before we run our gradient descent function, let’s add some print statements at the end so we can see the values of at the minimum of the function.

print('Minimum occurs at x-value:', min_x)
print('Slope at the minimum is: ', df(min_x))

Now, let’s run our gradient descent function and see what type of output we get with an example. In this example, the cost function is f(x) = x2. The initial guess for x is 3 and the learning rate is 0.1

my_fn = x**2
gradient_descent(my_fn, 3, 0.1)

Currently, we are running the learning loop an arbitrary amount of times. In this example, the loop runs 100 times. But maybe we don’t need to run the loop this many times. Oftentimes you already know ahead of time how precise a calculate you need. You can tell the loop to stop running once a certain level of precision is met. There are many ways you can implement this, but I’ll show you using that for loop we already have.

precision = 0.0001

for n in range(100):
    previous_x = new_x
    gradient = df(previous_x)
    new_x = previous_x - learning_rate * gradient
    
    step_size = abs(new_x - previous_x) 
    
    if step_size < precision:
        break

First, we define a precision value that the gradient descent algorithm should be within. You can also make this a parameter to the function if you choose.

Inside the loop, we create a new variable called step_size which is the distance between previous_x and new_x, which is the new guess that was just calculated in the “learning” step. We take the absolute value of this difference in case it’s negative.

If the step_size is less than the precision we specified, the loop will finish, even if it hasn’t reached 100 iterations yet.

Instead of solving a cost function analytically, the gradient descent algorithm converges on the minimum of a function by brute force. Like a blind-folded hiker, the algorithm goes down the valley (the cost function), following the slope of the graph until it reaches the minimum point.

How Do Machines Learn?

You’ve probably heard of machine learning models that can read human handwriting or understand speech. You might know that these models had to be trained in order to accomplish these tasks– they had to learn. But how exactly does a machine “learn”? What are the steps involved?

In this article, I’m going to be giving a high-level overview of how the “learning” in machine learning happens. I’m going to talk about fundamental ML concepts including cost functions, optimization, and linear regression. I’ll outline the basic framework used in most machine learning techniques.

Data is the foundational of any machine learning model. In a nutshell, the data scientist feeds a bunch of data into the ML model and, as it starts to “learn” from the data, the model will eventually develop a solution. What is the solution? The solution is typically a function that describes the relationship in the data. For a given input, the function should be able to provide the expected output.

In the case of linear regression, one of the most basic ML models, the regression model “learns” two parameters: the slope and the intercept. Once the model learns these parameters to the desired extent, the model can be used to compute the output y for a given input X (in the linear regression equation y = b0 + b1*X). If you’re unfamiliar with linear regression, take a look at my article on linear regression to understand this better.

So now that we know what the goal of machine learning is, we can talk about how exactly the learning happens. The machine learning model usually follows three core steps in order to “learn” the relationship in the data as described by the solution function:

  1. Predict
  2. Calculate the error
  3. Learn

The first step is for the model to make a prediction. To start, the model may make arbitrary guesses for the values that it is solving for in the solution function. In the case of linear regression, the ML model would make guesses for the values of the slope and intercept.

Next, the model would check its prediction against the actual test data and see how good/bad the prediction was. In other words, the model calculates the error in its prediction. In order to compare the prediction against the data, we need to find a way to measure how “good” our prediction was.

Finally, the model will “learn” from its error by adjusting its prediction to have a smaller error.

The model will repeat these 3 steps– predict, calculate error, and learn– a bunch of times and slowly come to the best coefficients for the solution. This simple 3-step algorithm is the basis for training most machine learning models.

When I talked about calculating error earlier, I didn’t talk about the ways in which we measure how “good” or “bad” our predictions are. That leads me to the next topic: cost functions. In machine learning, a cost function is a mechanism that returns the error between predicted outcomes and the actual outcomes. Cost functions measure the size of the error to help achieve the overall goal of optimizing for a solution with the lowest cost.

The objective of an ML model is to find the values of the parameters that minimize the cost function. Cost functions will be different depending on the use case but they all have this same goal.

The Residual Sum of Squares is an example of a cost function. In linear regression, the Residual Sum of Squares is used to calculate and measure the error in predicted coefficient values. It does this by finding the sum of the gaps between the predicted values on the linear regression line and the actual data point values (check out this article for more detail). The lowest sum indicates the most accurate solution.

Cost functions fall under the broader category of optimization. Optimization is a term used in a variety of fields, but in machine learning it is defined as the process of progressing towards the defined goal, or solution, of an ML model. This includes minimizing “bad things” or “costs”, as is done in cost functions, but it also includes maximizing “good things” in other types of functions.

In summary, machine learning is typically done with a fundamental 3-step process: make a prediction, calculate the error, and learn / make adjustments. The error in a prediction is calculated using a cost function. Once the error is minimized, the model is done “learning” and is left with a function that should provide the expected result for future data.

Introduction to Linear Regression

In this article, I will define what linear regression is in machine learning, delve into linear regression theory, and go through a real-world example of using linear regression in Python.

What is Linear Regression?

Linear regression is a machine learning algorithm used to measure the relationship between two variables. The algorithm attempts to model the relationship between the two variables by fitting a linear equation to the data.

In machine learning, these two variables are called the feature and the target. The feature, or independent variable, is the variable that the data scientist uses to make predictions. The target, or dependent variable, is the variable that the data scientist is trying to predict.

Before attempting to fit a linear regression to a set of data, you should first assess if the data appears to have a relationship. You can visually estimate the relationship between the feature and the target by plotting them on a scatterplot.

If you plot the data and suspect that there is a relationship between the variables, you can verify the nature of the association using linear regression.

Linear Regression Theory

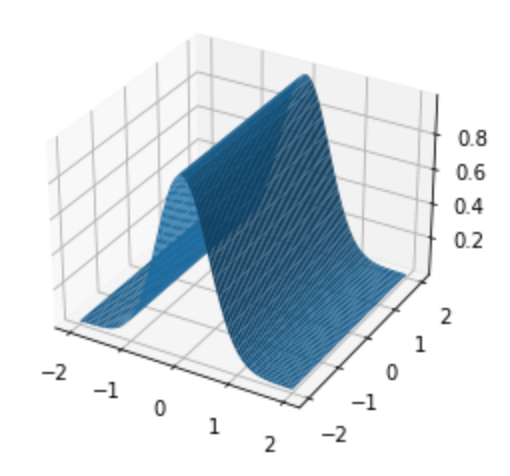
Linear regression will try to represent the relationship between the feature and target as a straight line.

Do you remember the equation for a straight line that you learned in grade school?

y = mx + b, where m is the slope (the number describing the steepness of the line) and b is the y-intercept (the point at which the line crosses the vertical axis)

Equation of a Straight Line

Equations describing linear regression models follow this same format.

The slope m tells you how strong the relationship between x and y is. The slope tells us how much y will go up or down for a given increase or decrease in x, or, in this case, how much the target will change for a given change in the feature.

In theory, a slope of 0 would mean there is no relationship at all between the data. The weaker the relationship is, the closer the slope is to 0. But if there is a strong relationship, the slope will be a larger positive or negative number. The stronger the relationship is, the steeper the slope is.

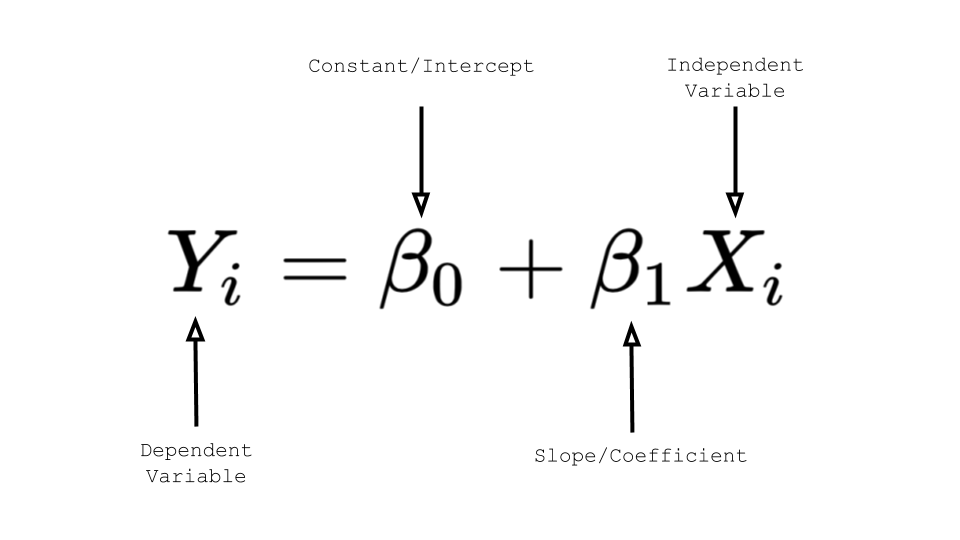
Unlike in pure mathematics, in machine learning, the relationship denoted by the linear equation is an approximation. That’s why we refer to the slope and the intercept as parameters and we must estimate these parameters for our linear regression. We even use a different notation in which the intercept constant is written first and the variables are greek symbols:

Simple Linear Regression in Python (From Scratch) | by Aidan Wilson |  Towards Data Science

Even though the notation is different, it’s the exact same equation of a line y=mx+b. It is important to know this notation though because it may come up in other linear regression material.

But how do we know where to make the linear regression line when the points are not straight in a row? There are a whole bunch of lines that can be drawn through scattered data points. How do we know which one is the “best” line?

There will usually be a gap between the actual value and the line. In other words, there is a difference between the actual data point and the point on the line (fitted value/predicted value). These gaps are called residuals. The residuals can tell us something about how “good” of an estimate our line is making.

Look at the size of the residuals and choose the line with the smallest residuals. Now, we have a clear method for the hazy goal of representing the relationship as a straight line. The objective of the linear regression algorithm is to calculate the line that minimizes these residuals.

For each possible line (slope and intercept pair) for a set of data:

  1. Calculate the residuals
  2. Square them to prevent negatives
  3. Add the sum of the squared residuals

Then, choose the slope and intercept pair that minimizes the sum of the squared residuals, also known as Residual Sum of Squares.

Linear regression models can also be used to estimate the value of the dependent variable for a given independent variable value. Using the classic linear equation, you would simply substitute the value you want to test for x in y = mx + b; y would be the model’s prediction for the target for your given feature value x.

Linear Regression in Python

Now that we’ve discussed the theory around Linear Regression, let’s take a look at an example.

Let’s say we are running an ice cream shop. We have collected some data for daily ice cream sales and the temperature on those days. The data is stored in a file called temp_revenue_data.csv. We want to see how strong the correlation between the temperature and our ice cream sales is.

import pandas
from pandas import DataFrame 

data = pandas.read_csv('temp_revenue_data.csv')

X = DataFrame(data, columns=['daily_temperature'])
y = DataFrame(data, columns=['ice_cream_sales'])

First, import Linear Regression from the scikitlearn module (a machine learning module in Python). This will allow us to run linear regression models in just a few lines of code.

from sklearn.linear_model import LinearRegression

Next, create a LinearRegression() object and store it in a variable.

regression = LinearRegression()

Now that we’ve created our object we can tell it to do something:

The fit method runs the actual regression. It takes in two parameters, both of type DataFrame. The feature data is the first parameter and the target data is the second. We are using the X and y DataFrames defined above.

regression.fit(X, y)     

The slope and intercept that were calculated by the regression are available in the following properties of the regression object: coef_ and intercept_. The trailing underline is necessary.

# Slope Coefficient
regression.coef_

# Intercept
regression.intercept_

How can we quantify how “good” our model is? We need some kind of measure or statistic. One measure that we can use is called R2, also known as the goodness of fit.

regression.score(X, y)
output: 0.5496...

The above output number (in percentage) is the amount of variation in ice cream sales that is explained by the daily temperature.

Note: The model is very simplistic and should be taken with a grain of salt. It especially does not do well on the extremes.

What is Data Science?

Data Mining is the application of specific algorithms for extracting patterns from data

For decades, data mining was being done with Statistics. In the 1990s, when Computer Science was getting exponentially popular, people started doing Data Mining with Computer Science.

Data Mining + Computer Science = Data Science

Data Science is an interdisciplinary field that uses scientific methods, processes, algorithms and systems to extract insights from data.

Fun fact: IBM pioneered the first relational database

There are three main career specializations within the Data Science field:

  1. Data Engineer
  2. Data Scientist
  3. Machine Learning Expert

The Data Engineer comes first in the process of creating value from data. It is the Data Engineer’s job to collect and store data. Then comes the Data Scientist; it is his/her job to take this data, clean it and explore/visualize it (w/ statistics, graphs, charts, etc.). After that, the Machine Learning Expert can apply intelligent algorithms to the data in order to extract insights from it.

Data Science Workflow

Data Scientist’s take a systematic approach to answering questions with data. It usually follows this pattern:

  1. Formulate Question
    • clear; scientifically testable
  2. Gather Data
  3. Clean Data
    • remove missing, incomplete, inaccurate data
  4. Explore & Visualize
    • helps to better understand the data
  5. Train Algorithm
  6. Evaluate
    • did the results answer our question?