Testing Event Handlers in React Testing

In this short article, you will learn how to test event handlers, such as button clicks, with React Testing.

First, we will create a simple component to test:

import React from "react";

export default function ButtonWrapper({ title, ...props }) {
  return <button {...props}>{title}</button>;
}

This ButtonWrapper component takes in a title prop and any other props and returns a standard JSX button element.

Now, create a testing file with the same name as the component file and a .test.js extension (or .test.tsx if you are using TypeScript) (i.e. ButtonWrapper.test.js)

First, import the following from React testing and import the component:

import React from "react";
import { render, screen, fireEvent } from "@testing-library/react";
import ButtonWrapper from "./ButtonWrapper";

Now, create the test and give it a name (i.e. "handles onClick")

test("handles onClick", () => {
 
})

Render the ButtonWrapper component:

render(<ButtonWrapper title={"Add"} />);

We will add an onClick property to the button and call the jest.fn() function whenever the component is clicked:

const onClick = jest.fn();
render(<ButtonWrapper onClick={onClick} title={"Add"} />);

jest.fn() is a function created by Jest which tracks how often it is called. In other words, it will keep track of how many times the button component is clicked.

Now, we will get access to the button and click it using fireEvent.click():

const buttonElement = screen.getByText("Add");
fireEvent.click(buttonElement);

fireEvent.click() simulates a click on the button element.

Next, we will write an assertion for how many times the button has been clicked. First, we will write an inaccurate assertion:

expect(onClick).toHaveBeenCalledTimes(0);

Now, we will run our test:

yarn test

This test will not pass because we know that the button was clicked once by the fireEvent call. The output should look like this:

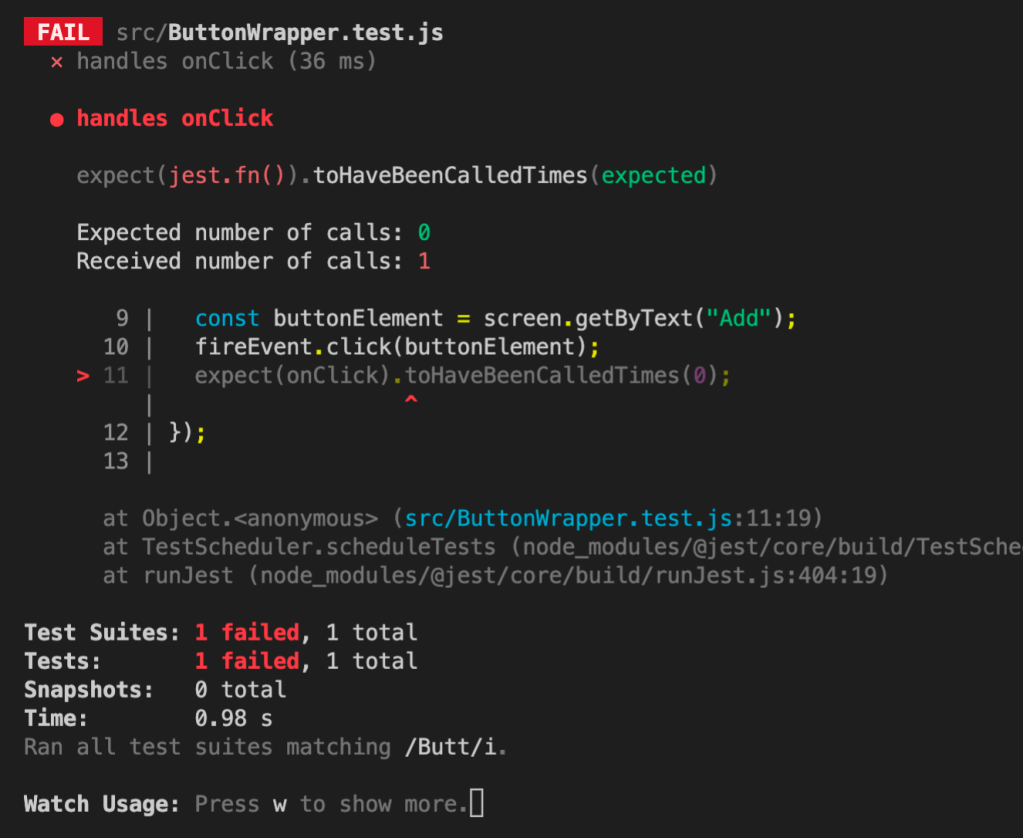
Basically, React Testing is saying that it expected 0 calls to be made, but it received 1 call.

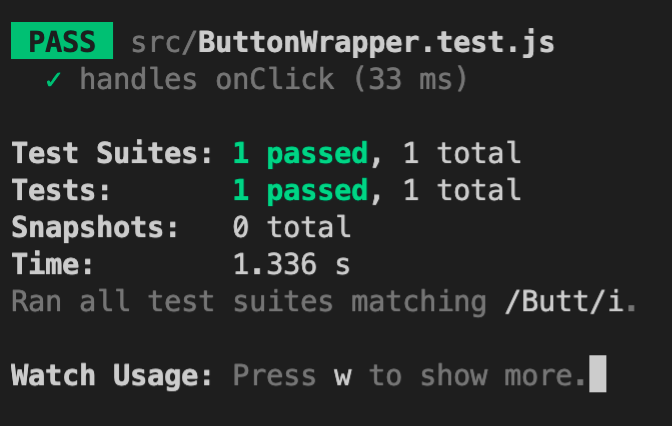
Now, let’s make a correct assertion:

expect(onClick).toHaveBeenCalledTimes(1);

The output should look like this:

Here is the final code:

import React from "react";
import { render, screen, fireEvent } from "@testing-library/react";
import ButtonWrapper from "./ButtonWrapper";

test("handles onClick", () => {
  const onClick = jest.fn();
  render(<ButtonWrapper onClick={onClick} title={"Add"} />);
  const buttonElement = screen.getByText("Add");
  fireEvent.click(buttonElement);
  expect(onClick).toHaveBeenCalledTimes(1);
});

Now, you can test event handlers in React Testing. Thanks for reading!

Basic Component Testing with React Testing and TypeScript

In this article, we will create a simple React component and do some basic testing on the component using React Testing. This will help you get acquainted with the React Testing library and how to write tests.

Installation

The React Testing library comes by default when you run create-react-app, so it should already be in your project if you created your React project with that command.

Create TypeScript component

First, we will create a component using TypeScript. Make a file called Container.tsx

In the Container component, we will have a div element with a h1 inside of it:

import React from "react";

export const Container = ({ title }: { title: string }) => (
  <div role="contentinfo">
    <h1>{title}</h1>
  </div>
);

We define a title prop with a type of string in TypeScript with the code: { title }: { title: string }

We also set an aria-role for the div element of type contentinfo

Write Tests

Now, let’s write some tests for this component

Create a test file called Container.test.tsx

First, we need to add some imports:

import React from "react";
import { render, screen } from "@testing-library/react";
import { Container } from "./Container";

As you can see, we are importing render and screen from the React testing library, which we will use momentarily.

To create a new test, we use the following structure (which is based on Jest, which is the underlying test framework):

test("Name of test", () => {
   // Function body of test
});

So, we will create a test named “renders title” and then define it:

test("renders title, () => {
    // Test will go here
})

First, render the Container component:

render(<Container title={"New Container"} />);

Next, get access to an element:

const titleElement = screen.getByText(/New Container/i);

There are many ways to get access to an element in the library

  • getByText
  • getByRole (aria-role)
  • getByLabelText
  • getByPlaceholderText

Make an assertion about the element:

expect(titleElement).toBeInDocument()

The above assertion is simply that the title element is in the Container component. This is just a very simple test.

So, here is the full test code:

test("renders title, () => {
    render(<Container title={"New Container"} />);
    const titleElement = screen.getByText(/New Container/i);
    expect(titleElement).toBeInDocument()
})

Run yarn test

The test output should look like this if it passed successfully:

Now, you have a basic introduction to testing components in React.

How to Split Training and Test Data in Python

In this article, I’ll be explaining why you should split your dataset into training and testing data and showing you how to split up your data using a function in the scikitlearn library.

If you are training a machine learning model using a limited dataset, you should split the dataset into 2 parts: training and testing data.

The training data will be the data that is used to train your model. Then, use the testing data to see how the algorithm performs on a dataset that it hasn’t seen yet.

If you use the entire dataset to train the model, then by the time you are testing the model, you will have to re-use the same data. This provides a slightly biased outcome because the model is somewhat “used” to the data.

We will be using the train_test_split function from the Python scikitlearn library to accomplish this task. Import the function using this statement:

from sklearn.model_selection import train_test_split

This is the function signature for the train_test_split function:

sklearn.model_selection.train_test_split(*arrays, test_size=None, train_size=None, random_state=None, shuffle=True, stratify=None)

The first parameters to the function are a sequence of arrays. The allowed inputs are lists, numpy arrays, scipy-sparse matrices or pandas dataframes.

So the first argument is gonna be our features variable and the second argument is gonna be our targets.

# X = the features array
# y = the targets array
train_test_split(X, y, ...)

The next parameter test_size represents the proportion of the dataset to include in the test split. This parameter should be either a floating point number or None (undefined). If it is a float, it should be between 0.0 and 1.0 because it represents the percentage of the data that is for testing. If it is not specified, the value is set to the complement of the train size.

This is saying that I want the test data set to be 20% of the total:

train_test_split(X, y, test_size=0.2)

train_size is the proportion of the dataset that is for training. Since test_size is already specified, there is no need to specify the train_size parameter because it is automatically set to the complement of the test_size parameter. That means the train_size will be set to 1 – test_size. Since the test_size is 0.2, train_size will be 0.8.

The function has a shuffle property, which is set to True by default. If shuffle is set to True, the function will shuffle the dataset before splitting it up.

What’s the point of shuffling the data before splitting it? If your dataset is formatted in an ordered way, it could affect the randomness of your training and testing datasets which could hurt the accuracy of your model. Thus, it is recommended that you shuffle your dataset before splitting it up.

We could leave the function like this or add another property called random_state.

random_state controls the shuffling applied to the data before applying the split. Pass an int for reproducible output across multiple function calls. We are using the arbitrary number 10. You can really use any number.

train_test_split(X, y, test_size=0.2, random_state=10)

The function will return four arrays to us: a training and testing dataset for the feature(s), and a training and testing dataset for the target.

We can use tuple unpacking to store the four values that the function returns:

X_train, X_test, y_train, y_test = train_test_split(X, y, test_size=0.2, random_state=10)

Now, you can verify that the splitting was successful.

The percent of the training set will be the number of rows in X_train divided by the total number of rows in the dataset as a whole:

len(X_train)/len(X)

The percent of the testing dataset will be the number of rows in X_test divided by the total number of rows in the dataset:

len(X_train)/len(X)

The numbers returned by these calculations will probably not be exact numbers. For example, if you are using an 80/20 split, then this division by give you numbers like 0.7934728 instead of 0.80 and 0.1983932 instead of 0.20.

That’s it!