What is JWT used for?
It is used for authorization, not authentication. Authentication is checking if a username and password are correct then logging a user in. Authorization is making sure that the user that is sending requests to your server is the same user that actually logged in during the authentication process.
The basic idea of JWT is a simple way for securely transmitting information between parties as a JSON object
What is the JSON Web Token structure?
A JWT is basically just a bunch of random characters. The token is separated into 3 sections: Header, Payload, and Signature. These sections are separated by dots (.) The structure looks like the following:
xxxxx.yyyyy.zzzzz
The JWT website (https://jwt.io) offers a great breakdown of an actual token:
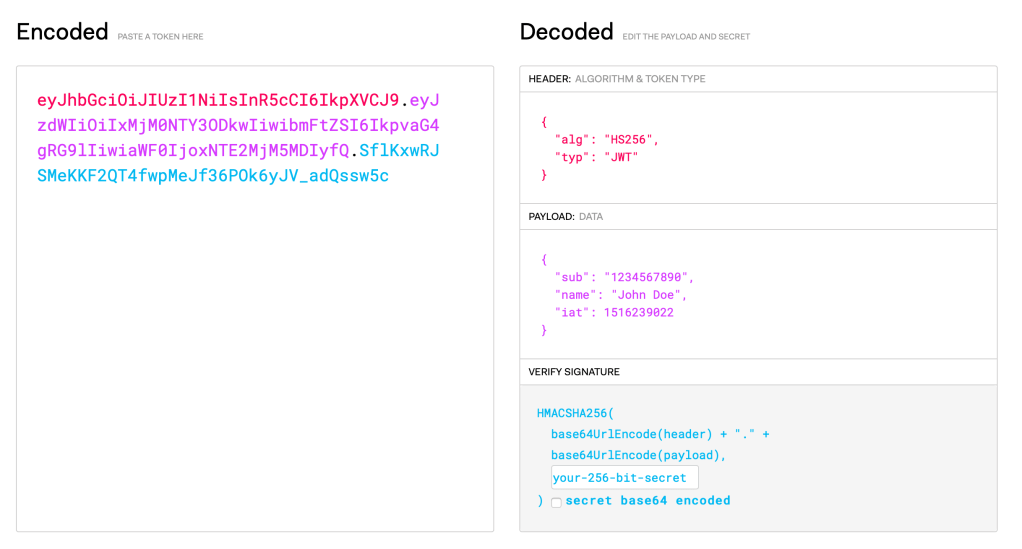
Header
The header typically consists of two parts: the type of the token, which is JWT, and the signing algorithm being used. Here’s an example:
{
   "alg": "SHA256",
   "typ": "JWT"
}
Then, this JSON is Base64Url encoded to form the first part of the JWT.
Payload
The payload is the data that you want to send within the token. In the example, the data being sent is a variable called name with a value of John Doe.
{
   "sub": "1234567890",
   "name": "John Doe",
   "admin": true
}
Another example might be sending an id variable with a unique value that differentiates all of the users of a website.
Signature
To create the signature part you have to take the encoded header, the encoded payload, a secret, the algorithm specified in the header, and sign that.
To create the signature part you have to take the encoded header, the encoded payload, a secret, the algorithm specified in the header, and sign that.
HMACSHA256(
  base64UrlEncode(header) + "." +
  base64UrlEncode(payload),
  secret)
The signature is used to verify the message wasn’t changed along the way, and, in the case of tokens signed with a private key, it can also verify that the sender of the JWT is who it says it is.
The output is three Base64-URL strings separated by dots that can be easily passed in HTML and HTTP environments.
Implementing JWT in Node applications
First, install the jsonwebtoken package with npm.
npm i jsonwebtokenGet access to JWT in the file
const jwt = require("jsonwebtoken");Create the payload
const payload = {
   user: {
      id: user.id
   }
}
Sign the token. Pass in the payload, pass in the secret, and inside the callback, we’ll either get the error or a token. If we get a token, we’ll send a response back to the client with that token.
jwt.sign(
   payload,
   config.get('jwtSecret'),
   { expiresIn: 360000 },
   (err, token) => {
      if (err) throw err;
      res.json({ token });
});
When you create a new user, if everything is successful, the callback should return a token like this:
{
"token": "eyJhbGciOiJIUzI1NiIsInR5cCI6IkpXVCJ9.eyJ1c2VyIjp7ImlkIjoiNWYwMjY2ZWM3ZjE4Y2JmNTg0NjgwZDM0In0sImlhdCI6MTU5Mzk5Mjk0MCwiZXhwIjoxNTk0MzUyOTQwfQ.8qiRsqHH-mSSrr9itAQzmSLUu8easVTNdeoUxg0AC0U"
}
If we paste this token that we’ve just created into the website that I showed you earlier, we can breakdown it’s header, payload, and signature:

In the payload, you can see our User object with its unique Mongo id (“user”, “id”), the date that the token was issued at (“iat”), and the expiration date that we defined (“exp”).
