Why should you care about making your websites responsive?
Around October 2016, the number of people who browse the web on mobile devices overtook the amount of people who browse the web on computers.
Mobile friendliness affects your Google search rankings. You can use Google’s Mobile-Friendly Test website to check the effectiveness of your responsive web design (https://search.google.com/test/mobile-friendly)
What are your options?
Do Nothing
Make a Separate Mobile Site (ex. Facebook)
Make Your Main Website Responsive (My Suggestion)
Media Queries
We use CSS Media Queries to make our websites responsive. There are many different media queries that only run under specific conditions. For example,
@media print {
   h1 {
      color: red;
   }
}
If our website is under the condition of being printed, then this condition will be true and it will apply these styles to the h1 elements on our page.
Some other examples:
@media screen (Dependent on the screen size or screen resolution)
@media speech (Will be activated if the website is being read to a person, such as a visually impaired person)
It can be a little alarming at first to see a glaring message from Github warning you of potential security vulnerabilities in the dependencies within your package.json file.
So we know that GitHub sends Dependabot alerts when they detect vulnerabilities affecting your repository. But what exactly do they mean by “vulnerability”?
A vulnerability is a problem in a dependency project’s code that could be exploited to damage the project and thus other projects that use its code (like yours). Vulnerabilities vary in type, severity, and method of attack.
When your code depends on a package that has a security vulnerability, this vulnerable dependency can cause a range of problems for your project or the people who use it.
Letting Github Handle Alerts
You can navigate to your security alerts by clicking the “See Dependabot alerts” button in the yellow warning message at the top of the repository.
Or go to the Security tab > Dependabot alerts
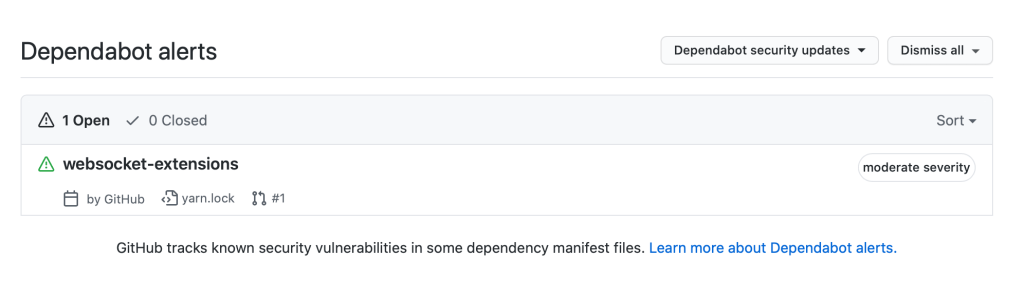
You should see an alert(s) like this:
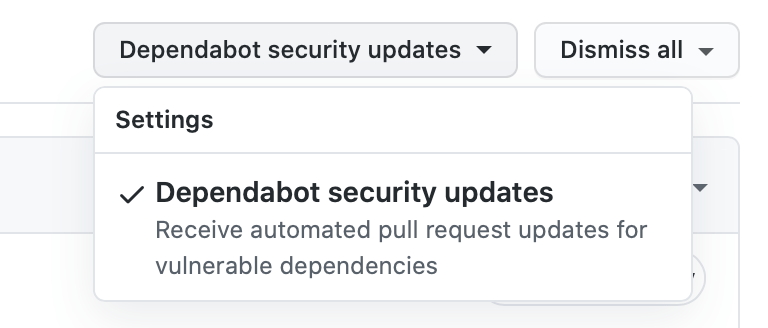
Make sure you have the “Dependabot security updates” option set to allow Github to automatically initialize pull request updates for vulnerable dependencies:
When Github has found a solution to the vulnerability, it will put a notification in the Pull Request section of your repository. Navigate to this section and you should see a pull request put here by Github:
Merge this pull request into your project and the problem should be solved!
Github is a tool that allows you to create a remote repository, a repository that’s hosted on somebody else’s server or computer.
You must create an account in order to follow the rest of the tutorial.
In the top right corner of the Github interface, select the “+” icon, then select “New repository.”
Give your new repository a Name and a Description. Choose to make your repository either Public or Private. DO NOT create a README.md file.
After you press “Create repository,” Github will take you to a page with comprehensive instructions on how to create/push to a repository in the Command Line.
Create a new folder using this command (insert your folder name in the placeholder):
mkdir folder-name
Now we’ll use this command to initialize an empty Git repository within our new folder:
git init
This command initializes an empty Git repository within the folder. The folder is now considered a “working directory.”
Working directory: The directory the .git directory is placed in
You won’t be able to see the .git file in the file system, though. In the Command Line, you have to type the following command to see the hidden files within your working directory in order to see the .git file:
ls -a
In order to commit your files so that you can start tracking changes in them, you must first add your files to the staging area.
Staging area: intermediate place where you can pick and choose which files inside your working directory that you want to commit
Use this command to see which files are currently untracked:
git status
Untracked files will show up in red.
Use this command to add files to your Git staging area (insert your file name in the placeholder):
git add your-file
Use this command to commit all files within the staging area to Version Control:
git commit -m "Initial Commit"
It’s recommended to add a commit message whenever you make a commit so you can differentiate the purpose behind different commits in the same project.
Use this command to see any previous commits you’ve made:
git log
When you have multiple files, it can get tedious adding each one of them to the staging area individually. You can use this command to add every (untracked) file in the working directory to the staging area:
git add .
Files flow in this sequence: Working directory -> staging area -> local repository
Even if we mess up our file(s), we still have access to any versions that were saved under Version Control. We can get access to these previous versions of our files using this command:
git checkout your-file
If you wanted to look at the differences between the current version of a file and the last version saved in Git Version Control, you can use this command:
Let’s say you’re building with the MERN stack, for example. You have an existing project folder in which you’ve set up your entire backend server with Express and connecting your MongoDB database. Now you want to append a React frontend to the project. How do you setup a new React project within your existing overall project folder?
cd into your existing project folder and run this command:
npx create-react-app [your-folder-name]
This line basically creates a React application within a folder with whatever name you choose (ex. client) within your current project directory. npx is a tool that comes with Node.js that allows us to run create-react-app without having to install it globally on our machine.
To run your React project to make sure everything installed successfully, run these commands:
cd [your-folder-name]
yarn start
Run Frontend and Backend at the Same Time
We can run our frontend React app and backend Node.js server at the same time using the development tool concurrently.
Install concurrently as a development dependency:
npm i -D concurrently
Define the necessary scripts within your package.json:
The “dev” script uses concurrently to run the “server” and “client” scripts at the same time– with one single command.
In the root folder, run the “dev” script:
npm run dev
Installing Dependencies Within the React Project
You install dependencies within a submerged React project the same way you would within an non-submerged React project.
First, make sure you’re inside the React project folder. My folder name is client so:
cd client
Then, install dependencies with npm
npm i react-redux axios ...
Get Ride of Default Git Repository Within React App
Within the React app, a git repository is automatically initialized on the creation of the React app. If you already have a Git repository within your root project, you don’t necessarily need another one for your React project. If you wanted to delete the React repository, you would
Delete the .gitignore and README.md files within the React folder
Delete the Git folder
This is the command to delete the git folder. Make sure you cd into your React folder before running this command or you might delete your root repository:
On the far-right side of your Visual Studio workspace, you may have a small file preview panel that shows a faint outline of the entire file that you’re currently in.
This little panel is called the minimap. Visual Studio Code’s definition of the minimap is as follows:
“A Minimap (code outline) gives you a high-level overview of your source code, which is useful for quick navigation and code understanding. A file’s minimap is shown on the right side of the editor. You can click or drag the shaded area to quickly jump to different sections of your file.”
The minimap can be annoying in some circumstances; for example, by limiting the length of your coding window.
How to Toggle the Minimap
Go to View > Command Palette (Ctrl + Shift + P on Windows, Cmd + Shift + P on Mac)
Type “minimap”
Press on ‘View: Toggle Minimap’ to toggle it on and off
It is used for authorization, not authentication. Authentication is checking if a username and password are correct then logging a user in. Authorization is making sure that the user that is sending requests to your server is the same user that actually logged in during the authentication process.
The basic idea of JWT is a simple way for securely transmitting information between parties as a JSON object
What is the JSON Web Token structure?
A JWT is basically just a bunch of random characters. The token is separated into 3 sections: Header, Payload, and Signature. These sections are separated by dots (.) The structure looks like the following:
xxxxx.yyyyy.zzzzz
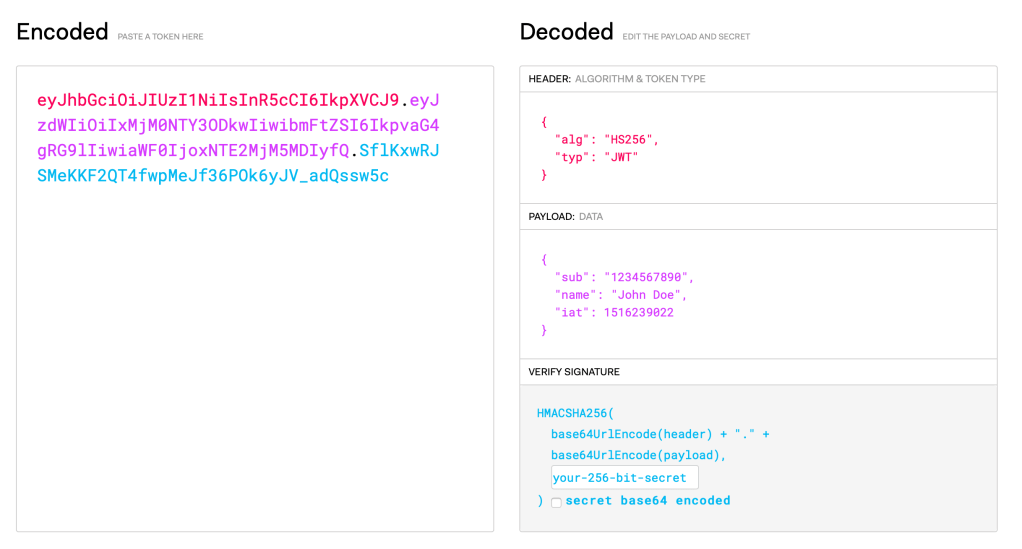
The JWT website (https://jwt.io) offers a great breakdown of an actual token:
Header
The header typically consists of two parts: the type of the token, which is JWT, and the signing algorithm being used. Here’s an example:
{
   "alg": "SHA256",
   "typ": "JWT"
}
Then, this JSON is Base64Url encoded to form the first part of the JWT.
Payload
The payload is the data that you want to send within the token. In the example, the data being sent is a variable called name with a value of John Doe.
The signature is used to verify the message wasn’t changed along the way, and, in the case of tokens signed with a private key, it can also verify that the sender of the JWT is who it says it is.
The output is three Base64-URL strings separated by dots that can be easily passed in HTML and HTTP environments.
Implementing JWT in Node applications
First, install the jsonwebtoken package with npm.
npm i jsonwebtoken
Get access to JWT in the file
const jwt = require("jsonwebtoken");
Create the payload
const payload = {
   user: {
      id: user.id
   }
}
Sign the token. Pass in the payload, pass in the secret, and inside the callback, we’ll either get the error or a token. If we get a token, we’ll send a response back to the client with that token.
If we paste this token that we’ve just created into the website that I showed you earlier, we can breakdown it’s header, payload, and signature:
In the payload, you can see our User object with its unique Mongo id (“user”, “id”), the date that the token was issued at (“iat”), and the expiration date that we defined (“exp”).
This is the App.jsx file. You would render an App Component in the ReactDOM.render method inside the index.js file. You can create your own HTML pages and CSS styles.
State is a React concept that allows us to make our apps more interactive and mutable.
React components has a built-in state object.
The user interfaces re-renders based on the value of state variables.
Declarative programming: the use of variables such as state to change an object’s property
Imperative programming: explicitly setting an object’s property
Imperative programming is about how a program works while Declarative programming is about what a program does.
Using regular variables to declaratively change the user interface of a React component will not work. You need a special kind of variable in order to cause React elements to re-render: State variables. You also need special functions called Hooks that look– or hook— into the state of your app to read and modify it.
You use the useState hook in order to get access to the component’s state.
import React from "react";

function App() {
   const state = React.useState();
}
Whatever we put into the parentheses of the useState function is the initial state of the component.
const state = React.useState(123);
If we wanted to access the state variable we just created, we would extract the first element of the state array:
console.log(state[0])
// prints out 123
Whenever you change state, React updates any UI elements corresponding w/ that piece of state automatically.
Using state[0] to access state variables is kind of unintuitive though and not the most efficient way to code. So we can use destructuring to make it easier on us as programmers: